11 Plus CAT4 Online Hidden Shape Paper Folding Spatial Reasoning Tests
Visuteach provides interactive online GL Assessment style 11 plus spatial reasoning questions in our spatial reasoning membership packages. Our membership packages include the following question types:
- Hidden Shapes (90 questions)
- Paper Folding (80 questions)
- Block Counting (80 questions)
- Matching Shape (80 questions)
- Jigsaw (80 questions)
- Combining Shapes (80 questions)
Spatial reasoning is a fairly new category of questions that forms part of the 11 plus Kent Test, the Lincs (Lincolnshire) Secondary Transfer Test and the Bucks (Buckinghamshire) Secondary Transfer Test (formerly known as the 11 plus). Spatial reasoning questions did not appear in GL Assessment 11 plus papers or tests before 2015, and only appear in certain regions now (e.g. Kent, Lincolnshire and Buckinghamshire). That means that there are relatively fewer familiarisation materials available for this question type than some of the other 11 plus question types.
Spatial reasoning (spatial awareness) questions test how well you can manipulate shapes and space in your head. The figure recognition, hidden shape (hidden shapes) spatial reasoning questions in the 11 Plus Kent Test, the Lincs Secondary Transfer Test and the Bucks Secondary Transfer Test are similar to some of the Figure Recognition spatial ability questions in the UK GL Assessment CAT4 test, which is a Cognitive Abilities Test (CAT test). Similarly, the figure analysis, paper folding, hole punching spatial reasoning questions in the Lincs Secondary Transfer Test and the Bucks Secondary Transfer Test are similar to some of the Figure Analysis spatial ability questions in the UK GL Assessment CAT4 test.
Visuteach’s hidden shape spatial reasoning questions are similar to the figure recognition, hidden shape spatial reasoning questions used in the Kent Test, the Bucks Secondary Transfer Test and the Lincolnshire Secondary Transfer Test. They are similar to the sample questions that appear in the Kent Test Familiarisation Booklet and the Bucks (Buckinghamshire) Secondary Transfer Test Familiarisation Booklet, although the Visuteach spatial reasoning questions are generally slightly more difficult. We have 90 figure recognition, hidden shapes spatial reasoning questions in our Spatial Reasoning Hidden Shape membership package.
Visuteach’s paper folding, hole punching spatial reasoning questions are similar to the figure analysis, paper folding, hole punching spatial reasoning questions that appear in the Bucks Secondary Transfer Test and in the Lincs Secondary Transfer Test. Sample figure analysis, paper folding questions are shown in the Bucks (Buckinghamshire) Secondary Transfer Test Familiarisation Booklet. We have 80 figure analysis, paper folding, hole punching spatial reasoning questions in our Spatial Reasoning Paper Folding membership package.
Video Explanations of Paper Folding, Hole Punching and Block Counting Spatial Reasoning Questions
GL Assessment Spatial Reasoning 11 Plus Demos
Spatial Reasoning Hidden Shapes
Untimed tests have answers immediately after each question, timed tests have answers at the end of the test.
Spatial Reasoning Hidden Shapes Demo (Untimed)
Spatial Reasoning Hidden Shapes Demo (Timed)
Spatial Reasoning Paper Folding
This test has answers and explanations immediately after each question.
Spatial Reasoning Paper Folding Demo (Untimed)
Spatial Reasoning Block Counting
This test has answers and explanations immediately after each question.
Spatial Reasoning Block Counting Demo (Untimed)
Spatial Reasoning Matching Shape
This test has answers and explanations immediately after each question.
Spatial Reasoning Matching Shape Demo (Untimed)
Spatial Reasoning Jigsaw
This test has answers and explanations immediately after each question.
Spatial Reasoning Jigsaw Demo (Untimed)
Spatial Reasoning Combining Shapes
This test has answers and explanations immediately after each question.
11 Plus Spatial Reasoning Sample Tests
You can download and print out a pdf file of Visuteach’s sample spatial reasoning test by clicking on the link below:
Visuteach 11 Plus Spatial Reasoning Sample Test
Alternatively, you can open the 11 plus spatial reasoning sample test below. The sample test below can be displayed in full screen mode by clicking on the Full Screen icon (which has has four small white diagonal arrows) on the toolbar at the bottom of the passage. To exit from full screen mode, you can click on the Full Screen icon or press the Esc key on your keyboard.
For mobile users, you can use pinch and zoom to enlarge the text.
The answers to the sample test are shown in the tabs below.
Spatial Reasoning Hidden Shapes


Spatial Reasoning Paper Folding
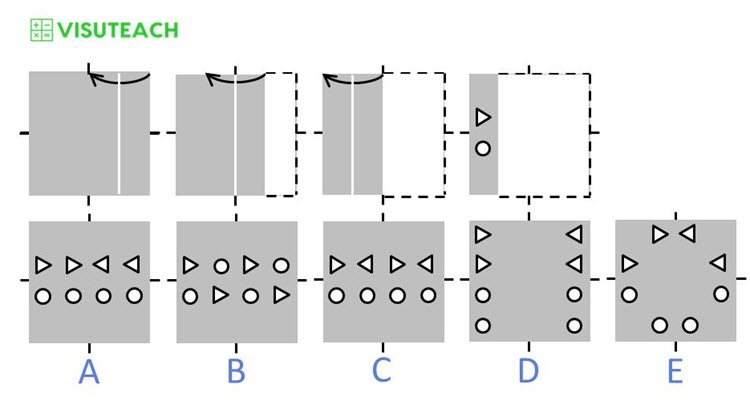

The first square in the top row shows a grey piece of paper at the start (before it is folded). There are small marks that show where the middle of each side is. The white line shows the crease along which the paper will be folded. The arrow shows the direction that the paper will be folded i.e. from the right side of the paper across towards the centre.
The second square in the top row shows the grey paper after the fold. The folded portion of the paper consists of two layers of paper (one on top of the other) because a single layer of paper has been folded on top of an underlying layer. The second square also shows the direction of the second fold i.e. from three quarters of the way across from the left side to one quarter of the way across from the left side.
The third square in the top row shows the grey paper after the second fold. The folded portion of the paper now consists of three layers of paper (two layers on top of one layer). The third square also shows the direction of the third fold i.e. from the centre towards the left side.
The fourth square in the top row shows the grey paper after the third fold. The folded portion of the paper now consists of four layers of paper (three layers on top of one layer). The fourth square also shows holes that have been punched through the folded paper.
Two holes are punched through the folded portion of paper, and the folded portion of paper has four layers of paper, so when the folded portion is unfolded, there will be eight holes (two holes per layer).
To find where the holes will be when the paper is unfolded, you need to work backwards by unfolding the last fold, and continue unfolding all folds until you have unfolded the first fold.
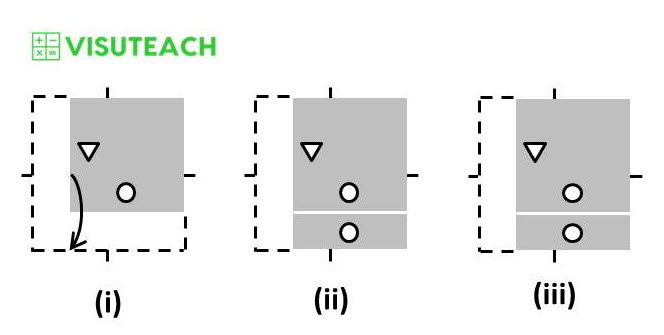
The third square on the top row shows the direction of the third fold operation (i.e. a fold from the centre to the left side). To unfold the paper (or undo the fold), you need to unfold in the opposite direction (i.e. from the left side to the centre) as shown in diagram (i) below. Diagram (ii) below shows the result of unfolding the third fold. A white line which is the crease or fold line (i.e. the line about which the paper has been folded and about which the paper needs to be unfolded) has been added to make the unfolding process clearer. Note that when you unfold a folded portion of paper, any holes on the folded paper are reflected in the fold line (i.e. the white line shown in diagram (ii)). Then removing the white line from diagram (ii), we get diagram (iii) which is the result of unfolding the third fold.
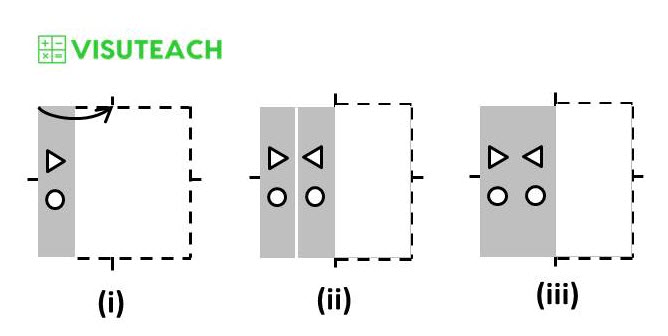
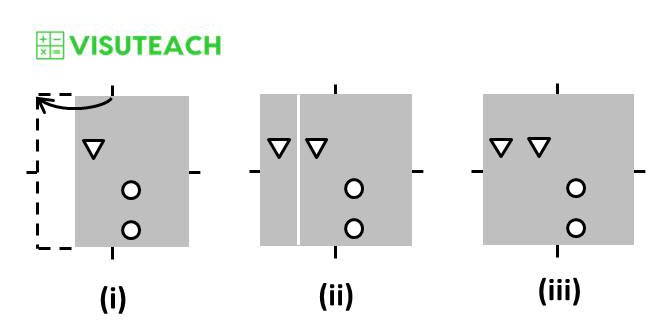
The second square on the top row shows the direction of the second fold operation (i.e. a fold from three quarters of the way across from the left side to one quarter of the way across from the left side). To unfold the paper (or undo the fold), you need to unfold in the opposite direction (i.e. from one quarter of the way across from the left side to three quarters of the way across from the left side) as shown in diagram (i) below. Diagram (ii) below shows the result of unfolding the second fold. A white line which is the crease or fold line (i.e. the line about which the paper has been folded and about which the paper needs to be unfolded) has been added to make the unfolding process clearer. Note that when you unfold a folded portion of paper, any holes on the folded paper are reflected in the fold line (i.e. the white line shown in diagram (ii)). Then removing the white line from diagram (ii), we get diagram (iii) which is the result of unfolding the second fold.
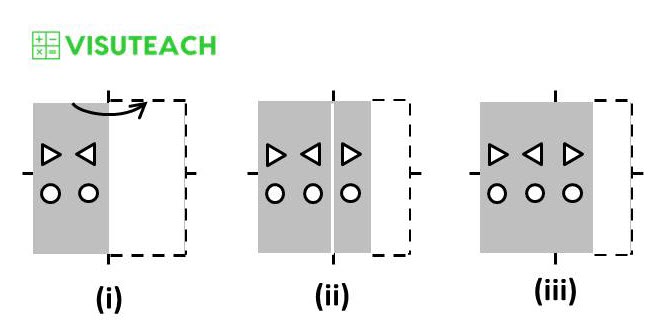
Next, you need to unfold (or undo) the first fold, which was a fold from the right side of the paper across towards the centre as shown in the first square on the top row of the question. To unfold the paper (or undo the fold), you need to unfold in the opposite direction (i.e. from the centre to the right side) as shown in diagram (i) below. Diagram (ii) below shows the result of unfolding the first fold. A white line which is the crease or fold line (i.e. the line about which the paper has been folded and about which the paper needs to be unfolded) has been added to make the unfolding process clearer. Note that when you unfold a folded portion of paper, any holes on the folded paper are reflected in the fold line (i.e. the white line shown in diagram (ii)). Then removing the white line from diagram (ii), we get diagram (iii) which is the result of unfolding the first fold.
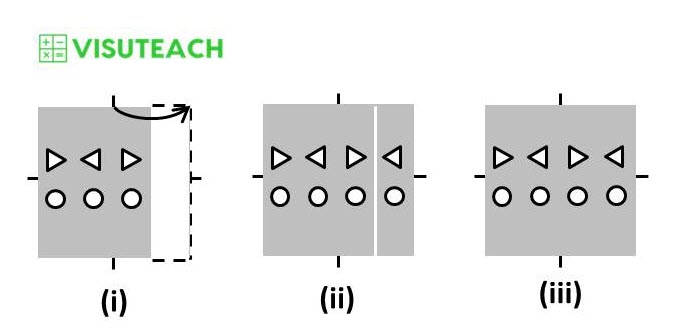
Therefore the answer to the question is C.
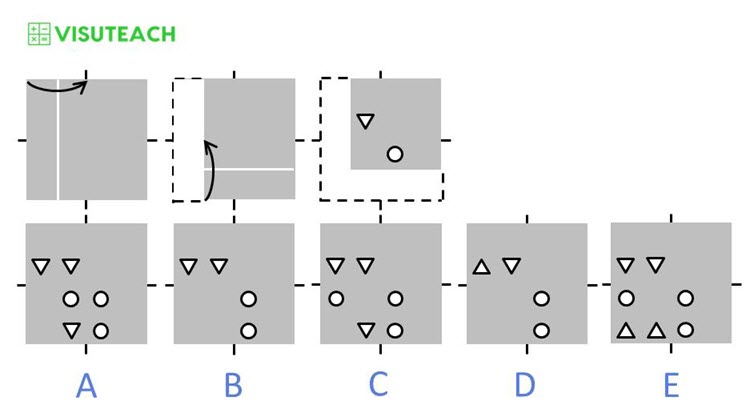

The first square in the top row shows a grey piece of paper at the start (before it is folded). There are small marks that show where the middle of each side is. The white line shows the crease along which the paper will be folded. The arrow shows the direction that the paper will be folded i.e. from left to centre.
The second square in the top row shows the grey paper after the fold. The second square also shows the direction of the second fold i.e. from bottom to centre.
The third square in the top row shows the grey paper after the second fold. The third square also shows holes that have been punched through the paper.
To find where the holes will be when the paper is unfolded, you need to work backwards by unfolding the last fold, and continue unfolding all folds until you have unfolded the first fold.
The second square on the top row shows the direction of the second fold operation (i.e. a fold from bottom to centre). To unfold the paper (or undo the fold), you need to unfold in the opposite direction (i.e. from centre to bottom) as shown in diagram (i) below. Diagram (ii) below shows the result of unfolding the second fold. A white line which is the crease or fold line (i.e. the line about which the paper has been folded and about which the paper needs to be unfolded) has been added to make the unfolding process clearer. Note that when you unfold a folded portion of paper, any holes on the folded paper are reflected in the fold line (i.e. the white line shown in diagram (ii)). In this case, there are no holes on the folded portion of paper that is being unfolded, therefore there is nothing to reflect. Then removing the white line from diagram (ii), we get diagram (iii) which is the result of unfolding the second fold.
Next, you need to unfold (or undo) the first fold, which was a fold from left to centre as shown in the first square on the top row of the question. To unfold the paper (or undo the fold), you need to unfold in the opposite direction (i.e. from centre to left) as shown in diagram (i) below. Diagram (ii) below shows the result of unfolding the first fold. A white line which is the crease or fold line (i.e. the line about which the paper has been folded and about which the paper needs to be unfolded) has been added to make the unfolding process clearer. Note that when you unfold a folded portion of paper, any holes on the folded paper are reflected in the fold line (i.e. the white line shown in diagram (ii)). Then removing the white line from diagram (ii), we get diagram (iii) which is the result of unfolding the first fold.
Therefore the answer to the question is B.
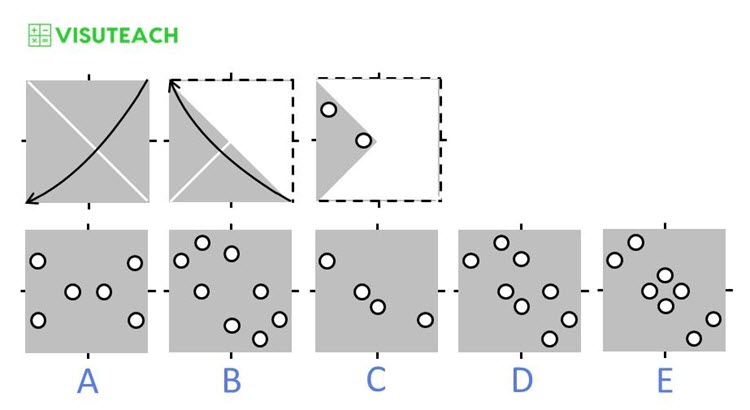

The first square in the top row shows a grey piece of paper at the start (before it is folded). There are small marks that show where the middle of each side is. The white line shows the crease along which the paper will be folded. The arrow shows the direction that the paper will be folded i.e. from top right to bottom left.
The second square in the top row shows the grey paper after the fold. The folded portion of the paper consists of two layers of paper (one on top of the other) because a single layer of paper has been folded on top of an underlying layer. The second square also shows the direction of the second fold i.e. from bottom right to top left.
The third square in the top row shows the grey paper after the second fold. The folded portion of the paper now consists of four layers of paper (two layers on top of another two layers). The third square also shows holes that have been punched through the folded paper.
Two holes are punched through the folded portion of paper, and the folded portion of paper has four layers of paper, so when the folded portion is unfolded, there will be eight holes (two holes per layer). This means that we can rule out any answer which does not have eight holes i.e. we can rule out the answers A and C.
To find where the holes will be when the paper is unfolded, you need to work backwards by unfolding the last fold, and continue unfolding all folds until you have unfolded the first fold.
The second square on the top row shows the direction of the second fold operation (i.e. a fold from bottom right to top left). To unfold the paper (or undo the fold), you need to unfold in the opposite direction (i.e. from top left to bottom right) as shown in diagram (i) below. Diagram (ii) below shows the result of unfolding the second fold. A white line which is the crease or fold line (i.e. the line about which the paper has been folded and about which the paper needs to be unfolded) has been added to make the unfolding process clearer. Note that when you unfold a folded portion of paper, any holes on the folded paper are reflected in the fold line (i.e. the white line shown in diagram (ii)). Then removing the white line from diagram (ii), we get diagram (iii) which is the result of unfolding the second fold.
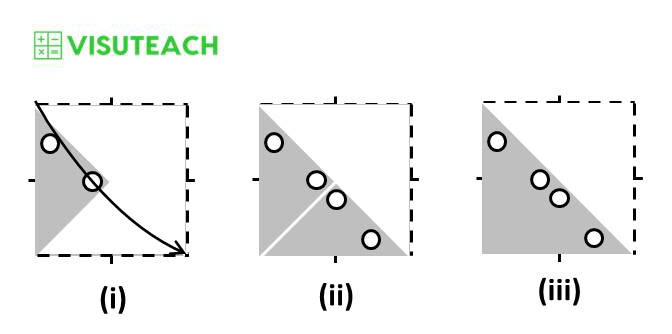
Next, you need to unfold (or undo) the first fold, which was a fold from top right to bottom left as shown in the first square on the top row of the question. To unfold the paper (or undo the fold), you need to unfold in the opposite direction (i.e. from bottom left to top right) as shown in diagram (i) below. Diagram (ii) below shows the result of unfolding the first fold. A white line which is the crease or fold line (i.e. the line about which the paper has been folded and about which the paper needs to be unfolded) has been added to make the unfolding process clearer. Note that when you unfold a folded portion of paper, any holes on the folded paper are reflected in the fold line (i.e. the white line shown in diagram (ii)). Then removing the white line from diagram (ii), we get diagram (iii) which is the result of unfolding the first fold.
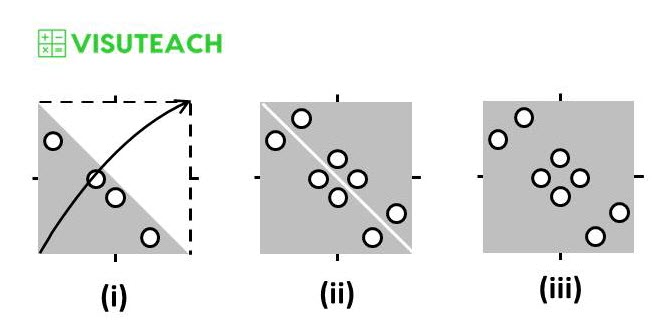
Therefore the answer to the question is E.
Spatial Reasoning Block Counting
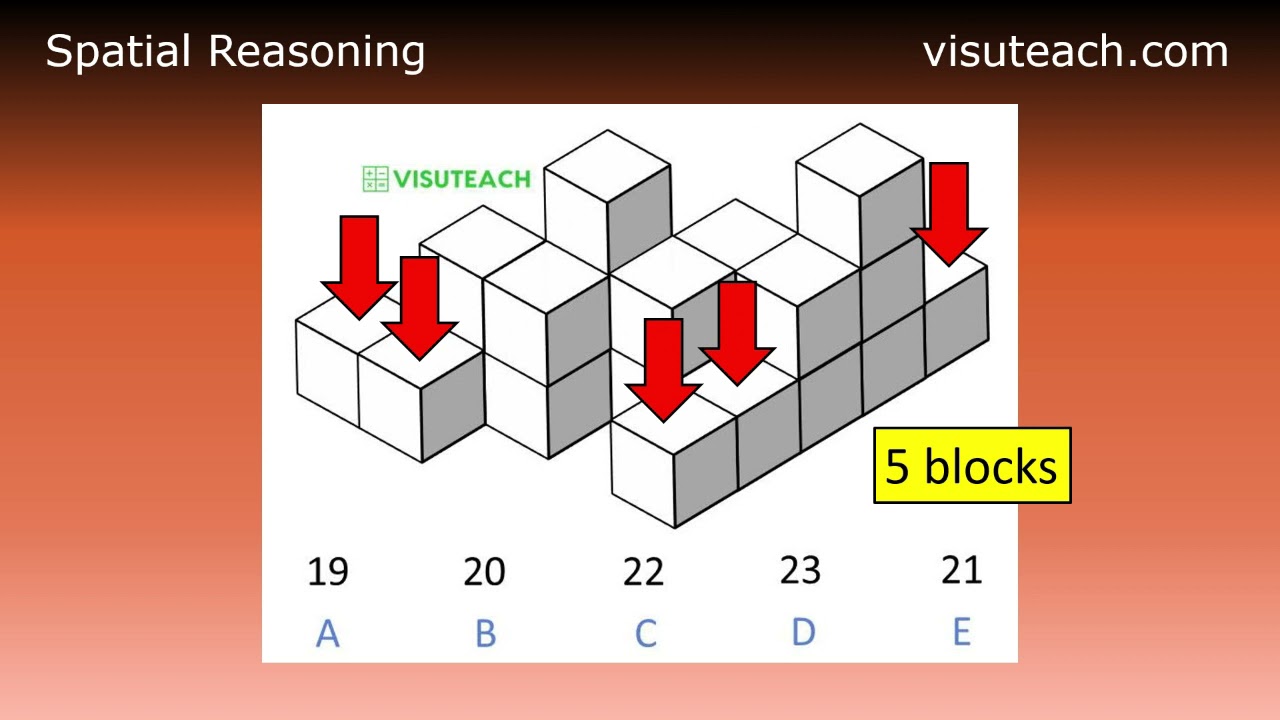
This question is about counting the number of blocks in a pile. Each block in the pile is the same size and shape. Some blocks are hidden from view but must be there to hold the visible blocks up. Choose the answer that shows the total number of blocks in the pile.
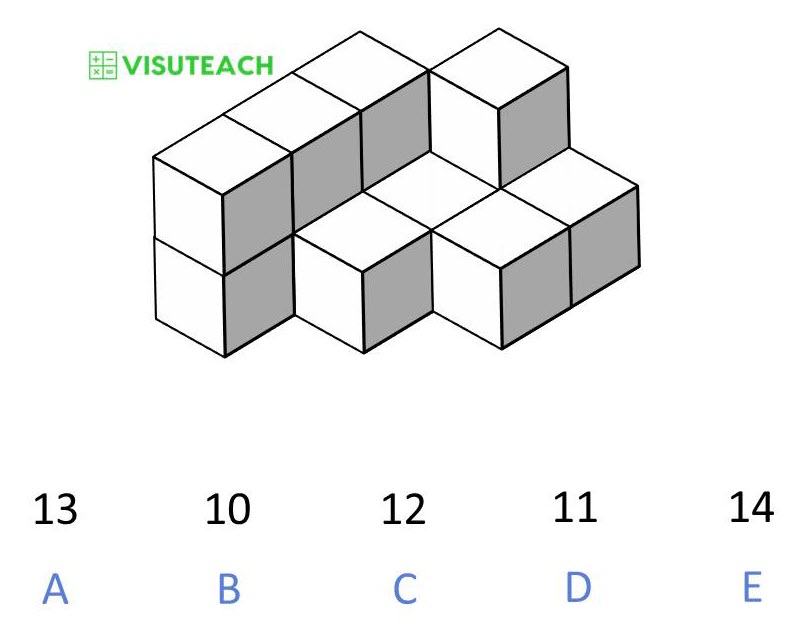
Answer: C

Define a single-storey block as being made up of 1 block (with no blocks stacked on top of it).
Define a two-storey block as being made up of 2 blocks (i.e. 2 single blocks stacked on top of each other).
This pile is made up of:
4 single-storey blocks which is a total of 4 blocks, and
4 two-storey blocks which is a total of 4 x 2 = 8 blocks.
Therefore the total number of blocks in the pile is 4 + 8 = 12.
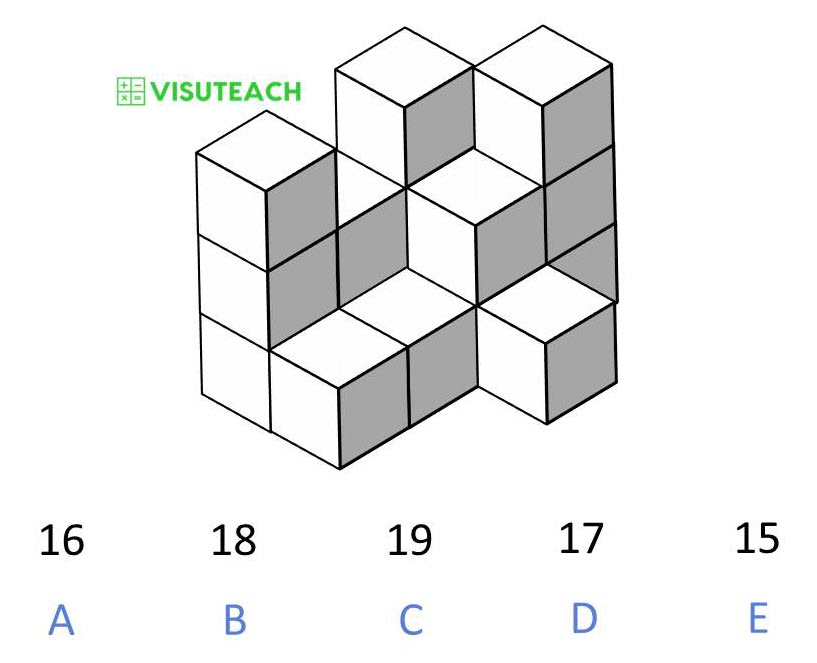

Define a single-storey block as being made up of 1 block (with no blocks stacked on top of it).
Define a two-storey block as being made up of 2 blocks (i.e. 2 single blocks stacked on top of each other).
Define a three-storey block as being made up of 3 blocks (i.e. 3 single blocks stacked on top of each other).
This pile is made up of:
3 single-storey blocks which is a total of 3 blocks,
2 two-storey blocks which is a total of 2 x 2 = 4 blocks, and
3 three-storey blocks which is a total of 3 x 3 = 9 blocks.
Therefore the total number of blocks in the pile is 3 + 4 + 9 = 16.
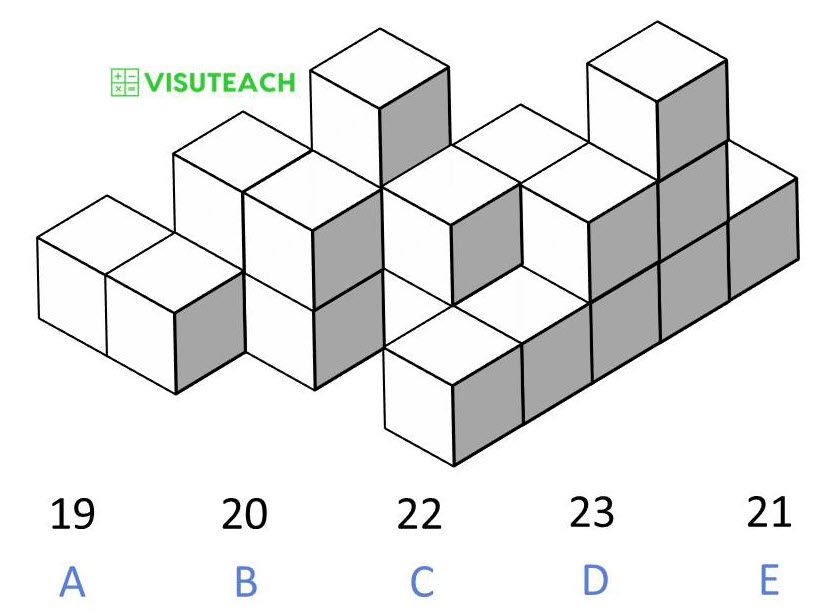

Define a single-storey block as being made up of 1 block (with no blocks stacked on top of it).
Define a two-storey block as being made up of 2 blocks (i.e. 2 single blocks stacked on top of each other).
Define a three-storey block as being made up of 3 blocks (i.e. 3 single blocks stacked on top of each other).
This pile is made up of:
5 single-storey blocks which is a total of 5 blocks,
5 two-storey blocks which is a total of 5 x 2 = 10 blocks, and
2 three-storey blocks which is a total of 2 x 3 = 6 blocks.
Therefore the total number of blocks in the pile is 5 + 10 + 6 = 21.
Spatial Reasoning Matching Shape
One of the five shapes on the right matches the shape on the left i.e. it is the same as the shape on the left, but it has been spun round. The other four shapes on the right do not match the shape on the left because they have been picked up and turned over, as well as possibly spun round. Choose the answer that shows the matching shape.


Answer: C

Spatial Reasoning Jigsaw


Spatial Reasoning Combining Shapes
The base shape is marked with one or more of the letters X, Y and Z. The shapes to the right of it are also marked with one of these letters. The way in which the shapes on the right are combined with the base shape is that the sides with matching letters must meet. Choose the answer that shows the combined shape.
Note that if a shape is added to the base shape, then it is placed outside the base shape. If a shape is subtracted from the base shape, then it is shaded in grey and is placed inside the base shape.
The way the shapes are combined (and if necessary rotated) to give the answer is shown in the diagram below:


